Honda Pilot 2015 Fuse Replacement
Having an electrical issue? It could be a blown fuse — an easy fix you can do yourself.
Follow the steps below to find and replace the fuse:
Step 1: Find the Fuse Box
In your Honda Pilot 2015, the interior fuse box is typically located under the dashboard on the driver's side. Some vehicles also have an additional fuse box in the engine compartment. Check your owner's manual or the fuse box cover for the exact location.
Step 2: Identify the Corresponding Fuse
Below is the complete fuse list for your vehicle. Find the circuit that isn't working and note the fuse number and amperage.
Passenger compartment Fuse Box
| Fuse # | Function | Amperage |
|---|---|---|
| 1 | VTM-4 | 7.5 |
| 2 | Fuel Pump | 15 |
| 3 | ACG | 10 |
| 4 | VSA | 7.5 |
| 5 | Heated Seat | 15 |
| 6 | Not Used | |
| 7 | Auto Light | 10 |
| 8 | Auto Light | 7.5 |
| 9 | ODS | 7.5 |
| 10 | Meter | 7.5 |
| 11 | SRS | 10 |
| 12 | Right Daytime Running Light | 10 |
| 13 | Left Daytime Running Light | 10 |
| 14 | Small Lights (Interior) | 7.5 |
| 15 | Small Lights (Exterior) | 15 |
| 16 | Right Head Light Low | 15 |
| 17 | Left Head Light Low | 15 |
| 18 | Daytime Running Light Main | 20 |
| 19 | Small Lights Main | 15 |
| 20 | Not Used | |
| 20 | TPMS | 7.5 |
| 21 | Head Light Low Main | 20 |
| 22 | VBSOL2 | 7.5 |
| 23 | STRLD | 7.5 |
| 24 | Not Used | |
| 25 | Not Used | |
| 26 | Driver’s Power Window | 20 |
| 27 | HAG OP | 20 |
| 28 | Moonroof | 20 |
| 29 | Door Lock | 20 |
| 30 | Front Passenger’s Power Window | 20 |
| 31 | Audio Amp (On vehicles with rear entertainment system) | 30 |
| 32 | Passenger’s Side Rear Power Window | 20 |
| 33 | Driver’s Side Rear Power Window | 20 |
| 34 | Not Used | |
| 35 | ACC | 10 |
| 36 | HAC | 10 |
| 37 | Day Light | 7.5 |
| 38 | Wiper | 30 |
Rear fusebox Fuse Box
| Fuse # | Function | Amperage |
|---|---|---|
| 1 | Small Light | 20 |
| 2 | Stop Lamp | 7.5 |
| 3 | Back Lamp | 7.5 |
| 4 | Turn Lamp, Hazard | 7.5 |
Engine compartment, primary fusebox Fuse Box
| Fuse # | Function | Amperage |
|---|---|---|
| 1 | Main Fuse | 120 |
| 1 | Not Used | |
| 2 | OP Main | 80 |
| 2 | IG Main | 50 |
| 3 | Not Used | |
| 3 | Not Used | |
| 4 | Head Light Main | 50 |
| 4 | Power Window Main | 40 |
| 5 | Not Used | |
| 6 | Condenser Fan | 30 |
| 7 | Cooling Fan | 30 |
| 8 | Rear Defroster | 30 |
| 9 | Blower | 40 |
| 10 | Front Fog Light | 20 |
| 11 | Sub | 15 |
| 12 | ACM | 10 |
| 13 | Front Passenger’s Power Seat Reclining | 20 |
| 14 | Front Passenger’s Power Seat Slide | 20 |
| 15 | Oil Level | 7.5 |
| 16 | Head Light Hi Main | 20 |
| 17 | Radio | 20 |
| 18 | IG Coil | 15 |
| 19 | Main | 15 |
| 20 | MG Clutch | 7.5 |
| 21 | DBW | 15 |
| 22 | Interior Light | 10 |
| 23 | Back Up | 10 |
Engine compartment, secondary fusebox Fuse Box
| Fuse # | Function | Amperage |
|---|---|---|
| 1 | Power Tail Gate Motor | 40 |
| 2 | VTM-4 | 20 |
| 3 | Trailer Main | 30 |
| 4 | VSA FSR | 40 |
| 5 | Rear Blower | 30 |
| 6 | VSA Motor | 30 |
| 7 | Hazard | 15 |
| 8 | Power Tail Gate Closer | 20 |
| 9 | Driver’s Power Seat Reclining | 20 |
| 10 | Driver’s Power Seat Slide | 20 |
| 11 | Stop & Horn | 20 |
| 12 | Rear Console Accessory Socket | 15 |
| 13 | Rear Wiper | 10 |
| 14 | Trailer E-Brake | 20 |
| 15 | A/C Inverter | 20 |
| 16 | Center Console Accessory Socket | 15 |
| 17 | Trailer Charge | 20 |
| 18 | Front Accessory Socket | 15 |
| 19 | Rear Accessory Socket | 15 |
| 20 | Glass Hatch Motor | 20 |
| 21 | Rear Heated Seat | 15 |
| 22 | Head Light Washer Motor | 30 |
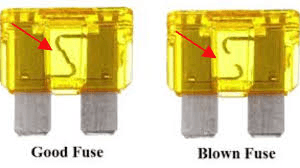
Step 3: Check the Fuse
Use the plastic fuse puller, typically found in the fuse box, to remove the fuse. Hold it up to a light source. If the metal filament inside is broken or charred, the fuse is bad and needs to be replaced.
Step 4: How to Get a Replacement
You can buy a replacement fuse at any auto parts store. Make sure you match the **amperage (A)** and **physical size** of the fuse exactly. For example, if you need a 20A fuse, get a 20A fuse.
Step 5: Replace the Fuse
Gently press the new fuse into the empty slot. You should feel a slight click when it's securely in place. Test the affected circuit to confirm it's working again.
What Now?
Fuse Was Blown — What to Buy
Ask at any auto parts store (AutoZone, O'Reilly, Advance Auto) for a blade fuse with the same amperage printed on the old one (e.g., 10A, 15A, 20A). Also match the physical size — mini (most modern cars), standard, or maxi. Replacement fuses cost under $5 and most stores sell assorted packs.
Fuse Looks Fine — Other Causes
If the fuse is intact, the problem isn't a blown fuse. Common alternatives include a bad relay (a click-sized electrical switch), a faulty wiring connection, or a failed component (motor, switch, module). At this point, a mechanic's diagnostic is the most reliable next step.
Frequently Asked Questions
What happens if I put in the wrong amperage fuse?
Higher amperage fuses won't protect the circuit and can cause wiring damage or fire. Lower amperage fuses will blow again immediately. Always match the exact amperage.
Why does my fuse keep blowing?
A repeatedly blown fuse indicates an underlying short circuit or overload. Replacing it again won't fix the root cause — consult a mechanic.
Do I need any tools?
Most cars come with a plastic fuse puller in the fuse box lid. If not, fine-tip needle-nose pliers work. A small flashlight helps.
How do I know what size fuse to buy?
Match the amperage printed on the old fuse (e.g., 10A, 15A, 20A) and the physical blade size (mini, standard, maxi). Auto parts stores carry assorted packs.