Chevrolet Impala 2014 Fuse Replacement
Having an electrical issue? It could be a blown fuse — an easy fix you can do yourself.
Follow the steps below to find and replace the fuse:
Step 1: Find the Fuse Box
In your Chevrolet Impala 2014, the interior fuse box is typically located under the dashboard on the driver's side. Some vehicles also have an additional fuse box in the engine compartment. Check your owner's manual or the fuse box cover for the exact location.
Step 2: Identify the Corresponding Fuse
Below is the complete fuse list for your vehicle. Find the circuit that isn't working and note the fuse number and amperage.
Instrument Panel Fuse Box
| Fuse # | Function | Amperage |
|---|---|---|
| MiniFuses | Spare | |
| 1 | Spare | 2013 |
| 2 | Rear Turn Stoplamp, Courtesy Lamps, Back-up Lamps, Shift Lock Solenoid, Puddle Lamps | |
| 3 | LED Indicator Light | |
| 4 | Radio | |
| 5 | Spare | 2014 |
| 6 | Power Outlet – Console Bin | |
| 7 | Power Outlet – Forward/ Console Rear | |
| 8 | Trunk Release, Brake Pedal Apply, Keyless Start Indicators, Hazard Switch Illumination, CHMSL/Brake Relay, Sidemarker Lamps, Washer Relay, Run/Crank Relay | |
| 9 | Trunk Lamp, Right Low Beam/DRL, Right Front Turn Lamp, Right Rear Park/Stoplamp | |
| 14 | Diagnostic Link Connector | |
| 15 | Airbag/SDM | |
| 16 | Spare | 2013 |
| 17 | Heater, Ventilation and Air Conditioning Controller | |
| 18 | Logistics | |
| 19 | Spare | 2014 |
| 20 | Ignition Switch | |
| 21 | Spare | 2014 |
| 22 | Steering Wheel Controls | |
| 23 | Left Low Beam/DRL, Left Front Turn Lamp, Left Rear Park/Stoplamp, Child Lock Relay | |
| 24 | Theft Deterrent LED, Key Capture Solenoid, Run Relay | |
| 25 | Tilt/Telescope Steering Column | |
| 26 | Spare | 110 |
| JCaseFuses | Spare | |
| 10 | Door Unlock | |
| 11 | Front Heater, Ventilation, and Air Conditioning Blower | |
| CircuitBreakers | Spare | |
| 12 | Power Seat – Passenger | |
| 13 | Power Seat –Driver | |
| Relays | Spare | |
| K1 | Not Used | |
| K2 | Logistic | |
| K3 | Power Outlet Relay |
Engine compartment Fuse Box
| Fuse # | Function | Amperage |
|---|---|---|
| MiniFuses | Spare | |
| 1 | Transmission Control Module Battery | |
| 2 | Engine Control Module Battery | |
| 3 | Air Conditioning Compressor Clutch | |
| 4 | Engine Control Module BATT 1 | |
| 5 | Engine Control Module Ignition | |
| 7 | Cool Pump | |
| 8 | Ignition Coils – Even | |
| 9 | Ignition Coils – Odd | |
| 10 | Engine Control Module | |
| 11 | Emissions | |
| 13 | Transmission Control Module / Chassis Control Module Ignition | |
| 14 | SAIR Solenoid | |
| 15 | MGU Coolant Pump (eAssist) / Not Used | |
| 16 | Aero Shutter / eAssist Ignition | |
| 17 | Seat Cooling Fans/ Heated Steering Wheel | |
| 18 | Battery Disconnect Unit | |
| 19 | Aero Shutter | |
| 23 | Adaptive Cruise Control / Power Pack (eAssist) | |
| 29 | Passive Entry/Passive Start Battery | |
| 30 | Canister Vent Solenoid / BPIM Battery (eAssist) | |
| 31 | Left Front Heated Seat | |
| 32 | Right Rear Stop. Turn Tail Lamp, RAP Relay, Ambient Lighting Control, Interior Switch Backlighting | |
| 33 | Right Front Heated Seat | |
| 34 | Antilock Brake System Valve | |
| 35 | Amplifier | |
| 37 | Right High Beam | |
| 38 | Left High Beam | |
| 46 | Cooling Fan | |
| 47 | Emissions | |
| 48 | Not Used / SAIR Valve (eAssist) | |
| 49 | Right HID Lighting | |
| 50 | Left HID Lighting | |
| 51 | Horn/Dual Horn | |
| 52 | Cluster Ignition | |
| 53 | Inside Rearview Mirror/Rear Camera | |
| 54 | Reflected LED Display, Console LED Display, Heating, Ventilation and Air Conditioning Module | |
| 55 | Outside Rearview Mirror | |
| 56 | Windshield Washer | |
| 60 | Heated Mirror | |
| 62 | Rear Camera/Park Assist/Side Blind Zone Alert | |
| 66 | Trunk Release | |
| 67 | Chassis Control Module | |
| 69 | Battery Voltage Sensor | |
| 70 | Not Used / Canister VentSolenoid (eAssist) | |
| 71 | Memory Seat | |
| J-CaseFuses | Spare | |
| 6 | Front Wiper | |
| 12 | Starter | |
| 21 | Rear Power Window | |
| 22 | Sunroof | |
| 24 | Front Power Window | |
| 25 | Accessory Relay | |
| 26 | Antilock Brake System Pump | |
| 27 | Electric Parking Brake | |
| 28 | Rear Defogger | |
| 41 | Vacuum Pump | |
| 42 | Cooling Fan K2 | |
| 44 | Not used / Transmission Auxiliary Pump (eAssist) | |
| 45 | Cooling Fan K1 | |
| 59 | Air Pump Emissions | |
| MidiFuses | Spare | |
| 5 | Accessory PowerModule | |
| MiniRelays | Spare | |
| 7 | Powertrain | |
| 9 | Cooling Fan K2 | |
| 13 | Cooling Fan K1 | |
| 15 | Run/Crank | |
| 16 | Air Pump Emissions | |
| 17 | Window/Mirror Defogger | |
| MicroRelays | Spare | |
| 1 | Air Conditioning Compressor Clutch | |
| 2 | Starter Solenoid | |
| 4 | Front Wiper Speed | |
| 5 | Front Wiper Control | |
| 6 | Air Pump Solenoid Emissions / Cabin Pump (eAssist) | |
| 10 | Cooling Fan K3 | |
| 11 | Starter / Transmission Oil Pump (eAssist) | |
| 14 | Low Beam HID | |
| 22 | Not used / Air Pump Solenoid Emissions (eAssist) |
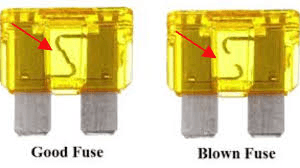
Step 3: Check the Fuse
Use the plastic fuse puller, typically found in the fuse box, to remove the fuse. Hold it up to a light source. If the metal filament inside is broken or charred, the fuse is bad and needs to be replaced.
Step 4: How to Get a Replacement
You can buy a replacement fuse at any auto parts store. Make sure you match the **amperage (A)** and **physical size** of the fuse exactly. For example, if you need a 20A fuse, get a 20A fuse.
Step 5: Replace the Fuse
Gently press the new fuse into the empty slot. You should feel a slight click when it's securely in place. Test the affected circuit to confirm it's working again.
What Now?
Fuse Was Blown — What to Buy
Ask at any auto parts store (AutoZone, O'Reilly, Advance Auto) for a blade fuse with the same amperage printed on the old one (e.g., 10A, 15A, 20A). Also match the physical size — mini (most modern cars), standard, or maxi. Replacement fuses cost under $5 and most stores sell assorted packs.
Fuse Looks Fine — Other Causes
If the fuse is intact, the problem isn't a blown fuse. Common alternatives include a bad relay (a click-sized electrical switch), a faulty wiring connection, or a failed component (motor, switch, module). At this point, a mechanic's diagnostic is the most reliable next step.
Frequently Asked Questions
What happens if I put in the wrong amperage fuse?
Higher amperage fuses won't protect the circuit and can cause wiring damage or fire. Lower amperage fuses will blow again immediately. Always match the exact amperage.
Why does my fuse keep blowing?
A repeatedly blown fuse indicates an underlying short circuit or overload. Replacing it again won't fix the root cause — consult a mechanic.
Do I need any tools?
Most cars come with a plastic fuse puller in the fuse box lid. If not, fine-tip needle-nose pliers work. A small flashlight helps.
How do I know what size fuse to buy?
Match the amperage printed on the old fuse (e.g., 10A, 15A, 20A) and the physical blade size (mini, standard, maxi). Auto parts stores carry assorted packs.